
Supercomputing Platform Product Introduction >>
The supercomputing platform launched by the Education Technology Center uses a high-performance parallel computing model: over ten high-performance servers run simultaneously; multiple computing resources are used; multiple processors work collaboratively to solve each problem. In these ways, the speed of the platform to computing large and complicated applications is much improved.
The cluster platform's computing nodes use 22nm Intel processors, which are relatively high peak bandwidths for the CPU, intending to reduce memory latency. Each computing node is also equipped with an InfiniBand HCA card to achieve efficient network interconnection so that all computing nodes can maintain point-to-point full wire-speed communication bandwidth.
Steps to Apply for a Supercomputing Platform
Visit (https://software.shufe.edu.cn), log in with your ID and NetID password. Find "Supercomputing Platform" on the homepage and click “view details” to enter the application.

Supercomputing Platform User Guide
1. Log in to the platform
Enter the platform login address (https://chaosuan.sufe.edu.cn) in the address bar of the browser (only Chrome and the more recent versions of Firefox are supported, and other browsers such as IE are not supported), and log in using the unified identity authentication (NetID) of the campus network of Shanghai University of Finance and Economics.
2. Add the applicatio
Click the "App Store" button at the bottom of the left menu bar to enter the app store page, and then click the "➕" button on the app card to add it directly to the app page.

3. Create an instance
You will see the applications you can use in the work window. Click the "+" button in the application, enter the instance name in the pop-up "Create Instance" window, define the name yourself, and click the "OK" button.


After creating a new instance, the working window will automatically jump to the "Instance" interface. You can see that the newly created instance displays at the bottom of the list, and it displays "Created successfully".

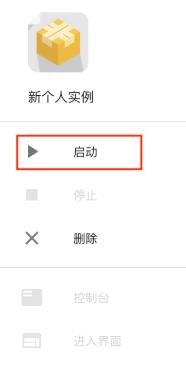
The instance has not started running at this stage, you need to click the button on the right side of the list, and the instance operation menu will pop up. Select "Start", fill in the expected running time in the window, click "OK", and then the system creates and runs the instance, and perform a health check on it. (If the physical resources of the platform hardware are insufficient, queuing will occur, and the instance status will display "queuing.")

4. Data Transmission
Click the "Data" button in the left menu bar to enter the data interface. According to the purpose of the file to be uploaded, select the corresponding shared file system. If it is a small file, such as a text or source program, select "NFS-file"; if it is a large file of computational data, such as video files, select "File", and this type of file will be stored in a high-speed parallel file system. Double-click to enter the folder to be saved. You can create a new folder if there isn't one